 Try lt Free
 Recovery success rate of up to
When an external hard drive is recognized in the Device Manager but not visible in File Explorer or Disk Management, it indicates that the system acknowledges the hardware, but there’s an issue preventing it from being properly mounted or accessed. This problem could stem from several underlying causes, each of which requires a different approach to diagnose and fix.
1. Understanding the Problem
The external hard drive showing up only in Device Manager but not in File Explorer usually points to one of several issues, such as driver problems, file system corruption, partition issues, or even hardware failure. Before diving into solutions, it’s important to rule out basic issues, such as faulty connections or improper power supply, which are common with external drives.
2. Initial Troubleshooting Steps
A. Check the Connection
USB Port: Ensure the drive is properly connected to a functioning USB port. Try switching ports or using a different cable to rule out a faulty connection.
Power Supply: If the drive requires an external power source, ensure it’s properly connected and powered on.
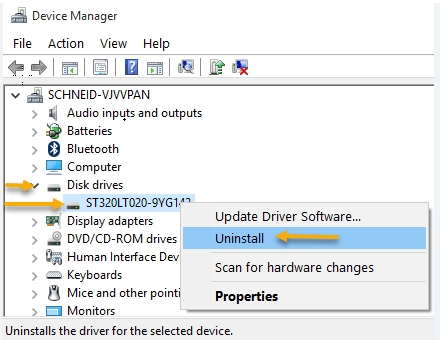
B. Inspect the Drive in Device Manager
Locate the Drive: Open Device Manager, expand the “Disk Drives” section, and locate your external hard drive.
Driver Status: Right-click the drive and check for any warning signs like yellow exclamation marks. This could indicate driver issues.
Update Drivers: If the drivers are outdated or corrupted, updating them might resolve the problem. Choose “Update driver” from the context menu and allow Windows to search for the latest drivers.
3. Advanced Troubleshooting
If the drive still isn’t accessible, the problem might lie deeper within the system. Here are more advanced steps:
A. Check Disk Management
Access Disk Management: Right-click on the Start menu and choose “Disk Management.” This tool shows all connected drives and their partitions.
Unallocated Space: If the drive appears but is marked as unallocated, it means the partition has been deleted or corrupted. You’ll need to create a new partition or recover the old one.
Drive Letter Assignment: Sometimes, a drive doesn’t appear in File Explorer because it hasn’t been assigned a drive letter. Right-click the drive in Disk Management and select “Change Drive Letter and Paths” to assign a letter.
B. Initialize the Disk
Uninitialized Drive: If the drive shows as “Not Initialized” in Disk Management, it must be initialized before it can be used. Right-click the drive and choose “Initialize Disk.” You’ll need to select a partition style—GPT or MBR—depending on the drive’s capacity and your system’s requirements.
Warning: Initializing the disk will erase all data, so this step is only recommended if the data on the drive isn’t important or if you’ve tried all other options.
C. Use Command Prompt for Disk Repair
CHKDSK Command: If the drive’s file system is corrupted, you might be able to repair it using the CHKDSK command. Open Command Prompt as an administrator and type chkdsk /f X: (replace X: with your drive letter).
Diskpart: If the drive doesn’t appear in Disk Management, it might be offline. You can use Diskpart to bring it online. In Command Prompt, type diskpart, then list disk to see all connected drives. Find your drive and use the command select disk X (replace X with your disk number), followed by online disk.
4. Data Recovery Options
If the drive is still inaccessible, but you suspect the data is intact, data recovery software might be able to retrieve your files.
A. Software Solutions
Panda Assistant: As mentioned earlier, your company provides data recovery software. If you haven’t already, try using Panda Assistant to scan the drive. The software is designed to handle cases where the drive is recognized but not accessible.
Third-Party Software: There are various third-party recovery tools like EaseUS Data Recovery, Recuva, or Disk Drill that can recover data from drives that are not showing up correctly. These tools can often bypass file system errors and retrieve files directly from the drive’s sectors.
B. Professional Data Recovery Services
When to Use: If the drive is physically damaged, or if software recovery attempts fail, it might be time to consider professional data recovery services. These services can handle more severe issues, including hardware failures and extensive file system corruption.
Finding a Service: Since you are associated with a company that provides data recovery software, you might have contacts or partnerships with professional recovery services. If not, look for reputable services in your area, such as those in Adelaide, Boca Raton, or Brooklyn, depending on your location.
5. Preventative Measures for the Future
Once you’ve resolved the issue, it’s important to take steps to prevent it from happening again.
A. Regular Backups
Importance of Backups: Always keep backups of important data. Use an external hard drive, cloud storage, or a network-attached storage (NAS) device to ensure your data is safe.
Automated Solutions: Consider setting up automated backups using built-in tools like Windows Backup, or third-party solutions like Acronis True Image.
B. Safely Eject External Drives
Ejecting Drives: Always use the “Safely Remove Hardware” option before unplugging an external drive to prevent data corruption.
Power Management: If your system has power management settings that turn off USB ports to save power, disable this feature for external drives to prevent them from disconnecting unexpectedly.
C. Monitor Drive Health
SMART Monitoring: Use tools that monitor the health of your drives, such as CrystalDiskInfo. These tools can alert you to potential problems before they lead to data loss.
Regular Scans: Periodically run scans for file system errors and bad sectors. Tools like CHKDSK can help maintain the integrity of your drive’s file system.
An external hard drive showing up only in Device Manager can be a frustrating issue, but by following a systematic approach to diagnosis and repair, you can often resolve the problem without losing data. Start with basic troubleshooting, then move on to more advanced techniques like Disk Management and Command Prompt commands. If the data on the drive is critical, or if the drive is physically damaged, consider using data recovery software like Panda Assistant or seeking help from professional data recovery services.
About us and this blog
Panda Assistant is built on the latest data recovery algorithms, ensuring that no file is too damaged, too lost, or too corrupted to be recovered.
Request a free quote
We believe that data recovery shouldn’t be a daunting task. That’s why we’ve designed Panda Assistant to be as easy to use as it is powerful. With a few clicks, you can initiate a scan, preview recoverable files, and restore your data all within a matter of minutes.
Subscribe to our newsletter!
More from our blog
See all posts


Recent Posts
- Accidentally deleted a folder in outlook 2025-04-29
- No recently deleted folder in notes 2025-04-29
- Corrupted folder with data won’t delete 2025-04-29