Retrieving data from a hard drive of a dead computer can be a complex task, but it’s often possible with the right approach and tools.
1.Situation
Before attempting data recovery, it’s essential to understand why the computer is “dead.” The issues could range from hardware failures (like a malfunctioning power supply or motherboard) to software problems (such as corrupted operating systems). Identifying the cause can help determine the best recovery method.
2. Safety First
Turn Off the Computer: If the computer is still powered on, turn it off immediately to prevent further damage to the hard drive.
Avoid DIY Fixes: If you suspect hardware issues, avoid trying to repair the computer yourself unless you’re knowledgeable about computer hardware.
3. Assessing the Hard Drive
A. Type of Hard Drive
HDD (Hard Disk Drive): More susceptible to physical damage, but data recovery is often possible with the right tools.
SSD (Solid State Drive): Typically more reliable, but data recovery can be more complex due to wear-leveling algorithms and the way data is stored.
B. Connection Type
Internal Hard Drives: Usually connected via SATA or IDE.
External Hard Drives: May connect via USB or other interfaces.
4. Tools You Might Need
Screwdrivers: For opening the computer case or removing the hard drive.
Data Recovery Software: If the drive is functional but the OS is not, software can help recover files.
External Enclosure or Adapter: For connecting the hard drive to another computer.
Backup Drives: To store recovered data.
5. Removing the Hard Drive
Power Down: Ensure the computer is completely off and unplugged.
Open the Case: Use appropriate screwdrivers to remove the screws and open the computer case.
Locate the Hard Drive: Find the hard drive, usually secured with screws and connected via cables.
Disconnect the Hard Drive: Carefully disconnect the power and data cables. Remove any screws securing the drive in place.
Remove the Hard Drive: Gently pull the drive out of the bay.
6. Connecting the Hard Drive to Another Computer
A. Using an External Enclosure
Purchase an Enclosure: Ensure it’s compatible with the type of hard drive (HDD or SSD).
Install the Drive: Open the enclosure and connect the hard drive following the manufacturer’s instructions.
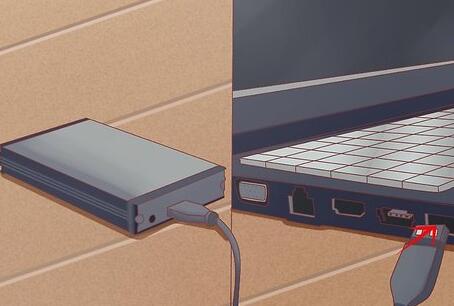
Connect to a Working Computer: Use a USB cable to connect the enclosure to another computer.
B. Using a SATA to USB Adapter
Get an Adapter: Buy a SATA to USB adapter if you don’t want to use an enclosure.
Connect the Drive: Connect the hard drive to the adapter and plug it into a working computer.
7. Data Recovery Process
A. Checking Drive Recognition
Boot the Working Computer: Turn on the computer with the connected hard drive.
Check Disk Management: On Windows, right-click on “This PC” or “My Computer” and select “Manage,” then “Disk Management.” On Mac, use “Disk Utility.”
Verify Detection: Ensure the drive is detected. If it shows up, you may proceed with data recovery.
B. Using Data Recovery Software
If the drive is recognized but files are inaccessible, use data recovery software. Here’s how to do it:
Choose Software: Options include Recuva, EaseUS Data Recovery Wizard, or Stellar Data Recovery.
Install Software: Install the chosen software on the working computer.
Run the Software: Open the software and select the external drive for scanning.
Scan for Files: Start a deep scan to search for recoverable files. This process may take time.
Preview and Recover: Once the scan completes, preview the recoverable files. Select the files you want to recover and choose a safe location on another drive to save them.
8. If the Drive Is Not Recognized
If the drive does not show up or is not accessible, further steps may be needed:
A. Check Physical Condition
Listen for Sounds: A clicking sound may indicate a mechanical failure.
Look for Damage: Inspect the drive for visible damage, such as burnt circuits or cracks.
B. Professional Data Recovery Services
If DIY methods fail or if the drive is physically damaged, consider professional data recovery services. They have specialized tools and cleanroom environments to handle physical repairs.
Research Providers: Look for reputable data recovery companies. Check reviews and success rates.
Get a Quote: Most companies will provide an assessment and quote before proceeding.
Backup Importance: Understand that recovery costs can be high, often ranging from $300 to over $2000. depending on the severity of the damage.
9. Preventing Future Data Loss
Once you’ve recovered your data, it’s crucial to take steps to prevent future data loss:
A. Regular Backups
Use Cloud Storage: Services like Google Drive, Dropbox, or OneDrive can automatically back up important files.
External Hard Drives: Regularly back up data to an external drive.
B. Monitor Hardware Health
Use Monitoring Software: Tools like CrystalDiskInfo can help monitor the health of your hard drive.
Replace Aging Drives: Consider replacing older drives before they fail.
About us and this blog
Panda Assistant is built on the latest data recovery algorithms, ensuring that no file is too damaged, too lost, or too corrupted to be recovered.
Request a free quote
We believe that data recovery shouldn’t be a daunting task. That’s why we’ve designed Panda Assistant to be as easy to use as it is powerful. With a few clicks, you can initiate a scan, preview recoverable files, and restore your data all within a matter of minutes.
Subscribe to our newsletter!
More from our blog
See all posts


Recent Posts
- How to recover a deleted slide in powerpoint? 2025-02-27
- How to recover deleted capcut videos? 2025-02-27
- How to recover a file deleted from a shared drive? 2025-02-27