 Try lt Free
 Recovery success rate of up to
Resetting a PC can be necessary for various reasons, including troubleshooting issues, cleaning up the system, or preparing the PC for a new user. Using a recovery USB is one effective way to perform this reset.
1. Preparation
1.1. Create a Recovery USB
Before you can reset your PC, you need a recovery USB. If you don’t already have one, you’ll need to create it. Here’s how:
1.1.1. Gather Materials:
USB Drive: Ensure you have a USB drive with at least 8 GB of storage.
Another Working Computer: This is needed to create the recovery USB.
1.1.2. Download the Recovery Tool:
For Windows 10/11: Go to the Microsoft website and download the Media Creation Tool.
For Other Systems: Use the recovery tools specific to your operating system.
1.1.3. Create the Recovery USB:
Insert the USB Drive: Plug the USB drive into the working computer.
Run the Media Creation Tool: Launch the tool you downloaded.
Select ‘Create Installation Media’: Choose this option, and then select the appropriate language, edition, and architecture for your PC.
Choose USB Flash Drive: When prompted, select ‘USB Flash Drive’ and follow the instructions to create the recovery USB.
1.2. Backup Your Data
Before resetting your PC, it’s crucial to back up any important data. This process will erase everything on your PC, so make sure you have copies of:
Documents
Photos
Videos
Other important files
You can use an external hard drive, cloud storage, or another backup method.
2. Boot from the Recovery USB
2.1. Insert the Recovery USB
Turn Off Your PC: Ensure the PC is completely powered off.
Insert the Recovery USB: Plug the USB drive into a USB port on your PC.
2.2. Access the BIOS/UEFI Settings
To boot from the recovery USB, you may need to access the BIOS or UEFI settings. Here’s how:
Turn On Your PC: Power it on.
Enter BIOS/UEFI: This typically involves pressing a key like F2. F12. ESC, or DEL during the boot process. The exact key varies by manufacturer.
Navigate to Boot Options: Use the arrow keys to find the boot options or boot order settings.
Select USB Drive: Change the boot order so that the USB drive is first. Save and exit the BIOS/UEFI settings.
3. Reset Your PC
3.1. Start the Recovery Process
Boot from the USB: Your PC should now boot from the recovery USB. You’ll see a Windows setup screen or similar interface.
Select Language and Preferences: Choose your language, time, and keyboard preferences, then click ‘Next.’
Install Windows (Optional): If you see an option to ‘Install Now,’ you can choose it if you want to perform a clean install of Windows. This will install a fresh copy of Windows on your PC.
3.2. Access Recovery Options
Choose Repair Your Computer: Instead of installing Windows, look for an option that says ‘Repair your computer’ or similar.
Select Troubleshoot: This will take you to a menu with various troubleshooting options.
3.3. Perform a Reset
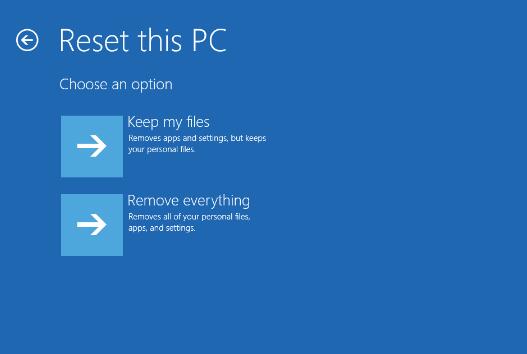
Choose Reset This PC: Select the option to reset your PC.
Choose an Option:
Keep My Files: This option will reset Windows but keep your personal files.
Remove Everything: This will remove all personal files, apps, and settings. Choose this if you want a complete reset.
Follow the Prompts: Follow the on-screen instructions to complete the reset. Your PC will restart multiple times during this process.
4. Post-Reset Steps
4.1. Set Up Windows
Initial Setup: After the reset, you’ll need to go through the Windows setup process. This includes setting up your user account, choosing privacy settings, and configuring other preferences.
Install Updates: Once setup is complete, make sure to check for Windows updates to ensure your system is up to date.
4.2. Reinstall Applications
Reinstall Software: Reinstall any applications or programs you need. You may need to download them again or use installation media.
Restore Files: Transfer your backed-up files back to your PC.
4.3. Check for Issues
Verify Functionality: Ensure that all hardware components, such as printers and external devices, are working correctly.
Run Diagnostics: If available, run any built-in diagnostics tools to check for issues.
About us and this blog
Panda Assistant is built on the latest data recovery algorithms, ensuring that no file is too damaged, too lost, or too corrupted to be recovered.
Request a free quote
We believe that data recovery shouldn’t be a daunting task. That’s why we’ve designed Panda Assistant to be as easy to use as it is powerful. With a few clicks, you can initiate a scan, preview recoverable files, and restore your data all within a matter of minutes.
Subscribe to our newsletter!
More from our blog
See all posts


