 Try lt Free
 Recovery success rate of up to
I. Fix a bad block on a hard drive
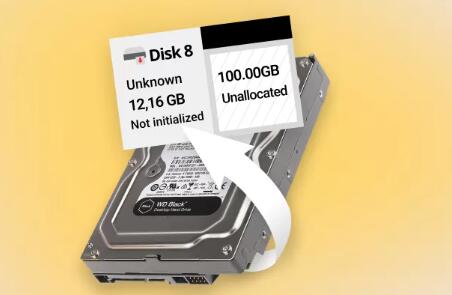
An unallocated hard drive refers to a storage space on a hard disk that has not been partitioned and formatted for use. This situation can occur due to various reasons, such as incorrect installation of the operating system, disk errors, or improper partitioning operations. When a hard drive shows up as unallocated, it means that the data on it is inaccessible, and the drive cannot be used normally. In the following content, we will introduce in detail how to identify the problem of the unallocated hard drive and the specific methods to solve it.
II. Identifying the Problem
Before attempting to fix the unallocated hard drive, it is necessary to accurately identify the cause of the problem. Here are some common methods and steps for identifying problems:
Check the Disk Management: In Windows, right – click on the “Start” button and select “Disk Management” from the menu. In the Disk Management window, you can view the status of all hard drives and partitions on your computer. If a hard drive is shown as unallocated, it will be displayed as an area without a partition or drive letter. In macOS, you can use the “Disk Utility” tool to check the disk status. Open “Disk Utility” in the “Utilities” folder of the “Applications” directory. Here, you can see the list of all disks and their partitions. If a disk is unallocated, it will be marked as such.
Inspect for Physical Damage: Check the hard drive for any physical damage, such as scratches, dents, or signs of overheating. Physical damage to the hard drive may cause it to malfunction and result in an unallocated status. If you find any physical damage, it is recommended to contact a professional data recovery service.
Check the Connection: Ensure that the hard drive is properly connected to the computer. For internal hard drives, check the SATA and power cables to make sure they are securely plugged in. For external hard drives, check the USB or other connection cables. A loose or damaged cable can cause the computer to not recognize the hard drive correctly, leading to an unallocated status. Try unplugging and replugging the cables to see if the problem is resolved.
Update Disk Drivers: Out – of – date or corrupted disk drivers can also cause issues with hard drive recognition. In Windows, go to the “Device Manager” by pressing the Windows key + X and selecting “Device Manager” from the menu. Expand the “Disk drives” category, right – click on the hard drive device, and select “Update driver”. Follow the on – screen instructions to update the driver. In macOS, the system usually updates disk drivers automatically, but you can also check for updates in the “Software Update” section of the “System Preferences”.
III. Methods to Fix Unallocated Hard Drive
Once the problem has been identified, the following are some common methods to fix the unallocated hard drive:
Create New Partitions: If the hard drive is unallocated because it has never been partitioned, you can create new partitions to make it usable. In Windows, in the Disk Management window, right – click on the unallocated space and select “New Simple Volume” from the context menu. Follow the on – screen wizard to create a new partition. You can choose the size of the partition, assign a drive letter, and select the file system (such as NTFS or FAT32). In macOS, in Disk Utility, select the unallocated disk and click the “Partition” button. Then, follow the prompts to create new partitions. You can choose the partition scheme and file system (such as Mac OS Extended (Journaled)).
Format the Hard Drive: Formatting the hard drive can also solve some problems related to the unallocated status. In Windows, after creating a new partition, you can right – click on the partition and select “Format”. In the Format dialog box, choose the file system, allocation unit size, and other options, and then click “Start” to format the partition. In macOS, after partitioning the disk, select the partition in Disk Utility and click the “Erase” button. Choose the file system and name for the partition, and then click “Erase” to start the formatting process. Note that formatting will erase all data on the hard drive, so make sure to back up important data before formatting.
Restore from a Backup: If you have a backup of the hard drive, you can restore the data to the unallocated hard drive. In Windows, you can use the built – in backup and restore features. Go to the “Control Panel” and select “System and Security”, then “Backup and Restore”. Follow the instructions to restore the backup to the unallocated hard drive. In macOS, you can use Time Machine to restore the backup. Connect the backup drive (usually an external hard drive) to the computer and open Time Machine. Select the backup you want to restore from and click the “Restore” button.
Use Third – Party Partition Management Tools: There are many third – party partition management tools available, such as EaseUS Partition Master, MiniTool Partition Wizard, and DiskGenius. These tools offer more advanced features and options for managing hard drives. For example, you can use these tools to resize partitions, convert file systems, recover lost partitions, and repair disk errors. Download and install a reliable third – party partition management tool, and then follow the software’s instructions to operate on the unallocated hard drive.
IV. Advanced Troubleshooting
If the above – mentioned methods do not solve the problem, the following are some advanced troubleshooting steps:
Check for Disk Errors: Use disk – checking tools to scan for and repair disk errors. In Windows, open the “Command Prompt” as an administrator and type the command “chkdsk /f [drive letter]”. Replace “[drive letter]” with the actual drive letter of the unallocated hard drive. This command will scan the disk for errors and attempt to repair them. In macOS, you can use the “First Aid” feature in Disk Utility. Select the unallocated disk or partition in Disk Utility and click the “First Aid” button. Disk Utility will scan the disk for errors and repair them if possible.
Perform a Low – Level Format: A low – level format is a more thorough formatting method that can sometimes solve problems that cannot be solved by a normal format. However, a low – level format is a time – consuming and potentially data – destructive operation, so it should be used with caution. There are some third – party tools available for performing low – level formats, such as HDD Low – Level Format Tool. Before using these tools, make sure to back up all important data. Follow the tool’s instructions to perform a low – level format on the unallocated hard drive.
Check the BIOS/UEFI Settings: Incorrect BIOS/UEFI settings can also affect the recognition of hard drives. Restart the computer and enter the BIOS/UEFI settings (usually by pressing a specific key during startup, such as F2. F10. or Del). In the BIOS/UEFI settings, check the storage settings to make sure that the hard drive is correctly detected. You can also try resetting the BIOS/UEFI to its default settings and see if that solves the problem.
V. Preventing Future Issues
To prevent the hard drive from becoming unallocated again in the future, the following preventive measures can be taken:
Regularly Back Up Data: Regularly back up important data to an external hard drive, cloud storage, or other storage media. This way, even if the hard drive becomes unallocated or fails, you can still restore the data from the backup. Set up a regular backup schedule to ensure that your data is always up – to – date.
Keep Drivers and System Updated: Keep the disk drivers and the operating system updated. Manufacturers often release driver updates to fix bugs and improve compatibility. The operating system also receives updates that can address various hardware – related issues. Enable automatic updates in both Windows and macOS to ensure that your system is always running the latest versions.
Handle Hard Drives with Care: When installing or removing hard drives, make sure to handle them carefully to avoid physical damage. Do not drop or shake the hard drive. For external hard drives, use a protective case to prevent damage during transportation. Also, avoid exposing the hard drive to extreme temperatures, humidity, or magnetic fields.
Use Reliable Storage Devices: Purchase hard drives from reliable manufacturers and avoid using counterfeit or low – quality products. Reliable hard drives usually have better quality control and are less likely to develop problems. Read reviews and do some research before buying a hard drive to ensure its reliability and performance.
About us and this blog
Panda Assistant is built on the latest data recovery algorithms, ensuring that no file is too damaged, too lost, or too corrupted to be recovered.
Request a free quote
We believe that data recovery shouldn’t be a daunting task. That’s why we’ve designed Panda Assistant to be as easy to use as it is powerful. With a few clicks, you can initiate a scan, preview recoverable files, and restore your data all within a matter of minutes.
Subscribe to our newsletter!
More from our blog
See all posts


Recent Posts
- Hard disk bad block repair 2025-04-11
- Truenas will scrub repair disk 2025-04-11
- Hard disk repair dubai 2025-04-11