To retrieve deleted files, the process depends on various factors such as the type of storage device you’re using, the operating system, and whether the files were permanently deleted or just moved to the trash/recycle bin.
1. File Deletion and Recovery
When you delete a file from your computer, the operating system doesn’t immediately remove it from the hard drive. Instead, it marks the space as available for new data. If new data doesn’t overwrite the marked space, there is a good chance that the deleted file can be recovered. However, the chances of recovery are much lower if the storage space has been overwritten by new data.
2. Understanding the Different Types of Deletion
Soft Deletion:
Recycle Bin/Trash: When a file is deleted in Windows or macOS, it often first goes to the Recycle Bin or Trash. Files in these locations are recoverable unless the Recycle Bin is emptied or the trash is permanently cleared.
Hard Deletion:
Permanent Deletion: In some cases, when you delete a file (and bypass the Recycle Bin), or use a “Shift + Delete” command in Windows, the file is removed from the system’s index. This doesn’t mean the file is gone; it just means the system has marked it as free space. These files can still be recovered unless the data has been overwritten.
3. Methods of File Recovery
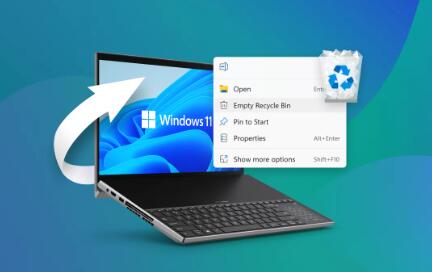
A. Recovering Files from the Recycle Bin/Trash
Windows (Recycle Bin)
Open the Recycle Bin from your desktop or file explorer.
Locate the deleted file or folder.
Right-click on it and choose Restore. The file will be restored to its original location.
Mac (Trash)
Open the Trash from the dock.
Find the deleted file.
Right-click on the file and select Put Back. The file will be restored to its original location.
This is the simplest and most effective way to restore deleted files, as long as they haven’t been permanently deleted by emptying the Recycle Bin/Trash.
B. Using File History or Backup (Windows)
If you have File History enabled or a backup created with Windows Backup, you can restore previous versions of files that were lost.
Restore Files Using File History:
Right-click on the folder where the file was originally stored.
Select Restore previous versions.
A list of available backups will appear. Choose the version that contains your deleted file and click Restore.
Windows Backup:
Open Control Panel > System and Security > Backup and Restore.
Click on Restore my files and follow the on-screen instructions to recover your files from the backup.
C. Using Time Machine (Mac)
If you’re using macOS and have Time Machine enabled, you can easily restore lost files.
Using Time Machine:
Open the folder where the deleted file was located.
Click the Time Machine icon in the menu bar and select Enter Time Machine.
Navigate through the backups using the timeline on the right-hand side.
Once you find the file, click Restore.
D. Recovering Files Using Data Recovery Software
Panda Assistant is an intuitive and powerful data recovery software designed to help users recover lost or deleted files from various storage devices, including hard drives, USB flash drives, SD cards, and external drives. Developed with ease of use in mind, Panda Assistant offers both novice and advanced users an accessible way to restore their important data without needing technical expertise.
Key Features of Panda Assistant
User-Friendly Interface
Panda Assistant stands out for its simple and clean interface. The software guides users through the recovery process with a straightforward step-by-step wizard, making it easy for anyone to use, regardless of their technical knowledge. The user interface is designed to ensure that recovery is as quick and hassle-free as possible.
Comprehensive Data Recovery
Panda Assistant supports the recovery of various file types, including documents, photos, videos, and audio files. Whether you’ve accidentally deleted a crucial report, lost images from a camera SD card, or lost a video from an external drive, Panda Assistant can help you recover those files. The software scans for lost data from the selected device and lists recoverable files, even from partitions that have been formatted or are corrupted.
Advanced Scanning Options
Panda Assistant offers multiple scanning modes to suit different recovery needs. You can choose a quick scan to recover recently deleted files or a deep scan for more thorough searches, which is useful when files have been lost for an extended period. Deep scanning works well for situations where files have been overwritten, or partitions have been accidentally formatted.
E. Recovering Files from Cloud Storage
If you use cloud storage services like Google Drive, OneDrive, or Dropbox, these platforms usually offer an easy way to recover deleted files.
Google Drive:
Go to Google Drive.
On the left sidebar, click on Trash.
Find the deleted file, right-click on it, and choose Restore.
OneDrive:
Log in to your OneDrive account.
Click on Recycle Bin in the left-hand panel.
Select the deleted file and click Restore.
Dropbox:
Go to Dropbox.com and log in.
Click on Files, then click on Deleted files.
Find the file you want to restore and click Restore.
Cloud services usually keep deleted files in the trash for 30 days (or more, depending on the service), so you’ll have a window of time to restore your files.
F. Recovering Files from a Hard Drive or External Storage (Windows/Mac)
In situations where files are deleted from external hard drives, USB flash drives, or SD cards, the recovery process is similar to internal drives.
Windows (External Drives):
Connect the external storage device to your computer.
Use the data recovery software (e.g., Recuva, EaseUS Data Recovery Wizard) to scan the external drive for deleted files.
Follow the on-screen instructions to restore the deleted files.
Mac (External Drives):
Connect the external device to your Mac.
Open Disk Utility to check if the drive is readable.
Use Time Machine or third-party data recovery software to recover files from the external device.
4. Advanced Data Recovery Techniques
If regular recovery methods fail or if the storage device has been physically damaged, you may need to try more advanced recovery methods:
File System Corruption:
Sometimes, files are not recoverable through standard software due to file system corruption. If you suspect this, try using disk repair utilities like chkdsk (Windows) or Disk Utility (Mac).
Run a repair tool on the damaged drive and see if it can restore the file system to a readable state.
Recovering Files from a Damaged Hard Drive:
If your hard drive is physically damaged, like making strange noises or failing to spin up, using software recovery tools may not be possible.
Consider contacting a professional data recovery service, which can often recover files from physically damaged drives by removing the hard disk and using specialized equipment.
5. Preventing Future Data Loss
While you can recover deleted files, prevention is always better than recovery. To avoid the headache of data loss in the future:
Backup Regularly:
Use cloud storage services or external drives for regular backups.
Set up Windows File History or Time Machine on Mac to automatically back up your data.
Use Reliable File Deletion Methods:
Avoid accidental deletion by using the trash or recycle bin instead of permanently deleting files right away.
If you need to securely delete files, use tools that ensure files are overwritten and not recoverable.
Enable Cloud Syncing:
Sync your important files to cloud storage (Google Drive, Dropbox, OneDrive) for an extra layer of protection.
About us and this blog
Panda Assistant is built on the latest data recovery algorithms, ensuring that no file is too damaged, too lost, or too corrupted to be recovered.
Request a free quote
We believe that data recovery shouldn’t be a daunting task. That’s why we’ve designed Panda Assistant to be as easy to use as it is powerful. With a few clicks, you can initiate a scan, preview recoverable files, and restore your data all within a matter of minutes.
Subscribe to our newsletter!
More from our blog
See all posts


Recent Posts
- Patch files may be corrupted mw3 2025-02-26
- How to repair corrupted rar file? 2025-02-26
- The file or directory is corrupted and unreadable 2025-02-26