 Try lt Free
 Recovery success rate of up to
Western Digital is a well – known brand in the storage device market, and their external hard drives are widely used for data backup, storage, and transfer. However, like any other storage device, Western Digital external hard drives can encounter various issues over time. These issues can range from minor software glitches to more serious hardware failures.
Common Issues with Western Digital External Hard Drives
Drive Not Recognized by the Computer
USB Connection Problems
Loose Connection: A common cause for the drive not being recognized is a loose USB connection. Check if the USB cable is firmly plugged into both the external hard drive and the computer’s USB port. Try unplugging and replugging the cable to ensure a proper connection.
Faulty Cable: The USB cable itself could be damaged. Replace the USB cable with a known – good one. Sometimes, a damaged cable can prevent the drive from receiving power or sending data signals correctly.
Driver Issues
Outdated or Corrupted Drivers: In some cases, the drivers for the external hard drive may be outdated or corrupted. On Windows, you can go to the Device Manager. Locate the “Disk drives” section, right – click on the Western Digital external hard drive entry, and select “Update driver”. Follow the on – screen instructions to update the driver.
Missing Drivers: If the computer fails to detect the drive at all, it could be due to missing drivers. Western Digital provides driver software on their official website. Download and install the appropriate drivers for your specific model of the external hard drive.
Power – Related Issues
Insufficient Power: Some external hard drives require more power than a standard USB port can provide. If your drive has a separate power adapter, make sure it is properly connected and the power supply is working. If it is a bus – powered drive (gets power from the USB port), try connecting it to a different USB port, preferably a high – power one (such as those on the back of a desktop computer).
Slow Data Transfer Speeds
USB Port Version Mismatch
USB 2.0 vs USB 3.0: Western Digital external hard drives are often available in USB 3.0 versions, which offer much faster data transfer speeds compared to USB 2.0. If you are using a USB 2.0 port to connect a USB 3.0 drive, the transfer speed will be limited to USB 2.0 speeds. Check the USB ports on your computer and ensure that you are using a USB 3.0 port if your drive supports it.
Fragmented Data
Disk Fragmentation: Over time, data on the hard drive can become fragmented, which means that files are stored in non – contiguous blocks. This can slow down data access and transfer speeds. On Windows, you can use the built – in Disk Defragmenter tool. Open the “This PC” window, right – click on the external hard drive, select “Properties”, and then go to the “Tools” tab. Click on “Optimize” to start the defragmentation process.
Drive – Specific Settings
Write Caching: Some Western Digital drives have write – caching enabled by default. While this can improve write performance, it may also cause issues if not configured properly. You can access the drive’s properties in Windows and check the “Policies” tab. If write caching is enabled, try disabling it to see if it improves the transfer speeds. However, be aware that disabling write caching may slightly reduce write performance but can increase data integrity.
Clicking Noises and Drive Failure
Mechanical Wear and Tear
Head – Disk Contact: Clicking noises coming from the external hard drive are often a sign of mechanical problems. The most common cause is the head – disk contact. Over time, the read/write heads of the hard drive can wear out or become misaligned. This can cause the heads to make contact with the disk surface, resulting in clicking noises. In such cases, the drive may be on the verge of failure.
Bearing Issues: The bearings that support the spinning disk can also wear out. When the bearings start to fail, they can cause the disk to spin unevenly, leading to clicking or grinding noises.
Power – Related Mechanical Failures
Incorrect Voltage: If the power supply to the external hard drive is not providing the correct voltage, it can cause mechanical components to malfunction. This can result in the drive making abnormal noises and potentially failing. Make sure the power adapter is the correct one for your drive model and that it is providing the proper voltage.
Software – Based Repairs
Using Western Digital’s Data Lifeguard Tools
Downloading and Installing Data Lifeguard Tools
Western Digital provides a set of diagnostic and repair tools called Data Lifeguard Tools. These tools are available for free on their official website. Download the appropriate version of the Data Lifeguard Tools for your operating system (Windows or Mac). Follow the installation instructions to install the software on your computer.
Running Diagnostic Tests
Quick Test: Once installed, launch the Data Lifeguard Tools. Select the Western Digital external hard drive from the list of available drives. The Quick Test is a fast diagnostic that checks for basic drive functionality, such as the drive’s ability to read and write data. It can detect common issues like bad sectors or incorrect drive formatting.
Extended Test: If the Quick Test reveals any issues or if you suspect more serious problems, run the Extended Test. This test is more comprehensive and takes longer to complete. It thoroughly checks the entire drive surface for bad sectors and other mechanical and electrical problems.
Repairing Drive Issues
Bad Sector Repair: If the tests detect bad sectors, the Data Lifeguard Tools may be able to mark these sectors as bad and remap the data to good sectors on the drive. This can help improve the drive’s performance and prevent data loss. However, if the number of bad sectors is excessive, it may be a sign of a more serious hardware problem.
Using Windows Disk Management
Accessing Disk Management
On Windows, you can access Disk Management by right – clicking on the “This PC” icon and selecting “Manage”. In the Computer Management window, click on “Disk Management” in the left – hand pane.
Initializing and Formatting the Drive
Initialization: If the Western Digital external hard drive is new or has not been recognized properly, it may need to be initialized. In Disk Management, if the drive shows up as “Unallocated”, right – click on the drive and select “Initialize Disk”. Choose the appropriate partition style (MBR for most Windows systems or GPT for larger drives or systems with UEFI firmware).
Formatting: After initialization, you can format the drive. Right – click on the unallocated space on the drive and select “New Simple Volume”. Follow the wizard to create a new partition and format the drive using the desired file system (NTFS for Windows – based systems, exFAT for cross – platform compatibility). However, note that formatting will erase all data on the drive, so make sure you have a backup if necessary.
Using CHKDSK (Check Disk)
Running CHKDSK on Windows
CHKDSK is a built – in Windows utility that can check for disk errors and repair them. To run CHKDSK on the Western Digital external hard drive, open the Command Prompt as an administrator. Type the command “chkdsk [drive letter]: /f /r”, where [drive letter] is the letter assigned to your external hard drive. For example, if your drive is assigned the letter “E”, the command would be “chkdsk E: /f /r”.
The “/f” parameter tells CHKDSK to fix any errors it finds, and the “/r” parameter tells it to locate bad sectors and recover readable information. This process may take some time, depending on the size of the drive and the number of errors.
Hardware – Related Repairs (Advanced and Risky)
Opening the External Enclosure
Precautions
Opening the external enclosure of a Western Digital hard drive voids the warranty. Additionally, improper handling can cause further damage to the drive. Before attempting to open the enclosure, make sure you have a clean, static – free work area. Use an anti – static wrist strap to prevent electrostatic discharge from damaging the sensitive electronic components inside the drive.
Removing the Enclosure
Different Western Digital external hard drive models have different enclosure designs. Some enclosures are held together by screws, which can be removed using a screwdriver. Others may have snap – on or clip – on mechanisms. Carefully examine the enclosure to determine how it can be opened without using excessive force.
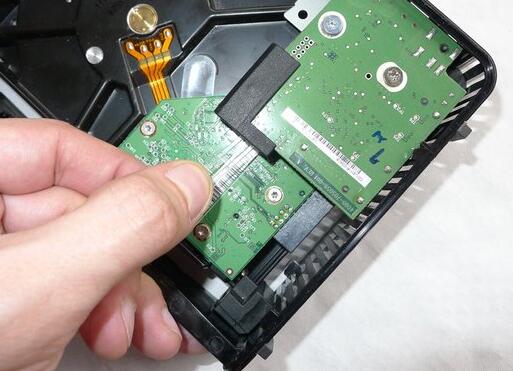
Inspecting the Internal Components
Cable Connections: Once the enclosure is open, check the cable connections between the hard drive and the circuit board inside the enclosure. Make sure the cables are firmly connected and not damaged. If you find any loose or damaged cables, you may be able to replace them.
Circuit Board Condition: Inspect the circuit board for any signs of damage, such as burned components or corrosion. If you notice any visible damage to the circuit board, it may be possible to replace the circuit board with a compatible one. However, this requires some technical skills and knowledge of electronics.
Replacing the Circuit Board
Finding a Compatible Circuit Board
To replace the circuit board, you need to find a compatible one. The model number of the hard drive and the circuit board can usually be found on the label of the drive or the circuit board itself. Search for the exact model number of the circuit board online to find a replacement. Make sure the replacement circuit board is from the same model series of the Western Digital hard drive.
Transferring the ROM Chip
In some cases, the hard drive’s circuit board has a ROM chip that contains important drive – specific information. When replacing the circuit board, you may need to transfer the ROM chip from the old board to the new one. This is a very delicate process that requires soldering skills. If not done correctly, it can permanently damage the drive.
Reassembling the Drive
After replacing the circuit board (and transferring the ROM chip if necessary), carefully reassemble the external enclosure. Make sure all components are properly aligned and the cables are securely connected. Then, try connecting the drive to the computer to see if it is recognized and functioning properly.
Data Recovery Considerations
Professional Data Recovery Services
If your Western Digital external hard drive has failed and you need to recover important data, it may be worth considering professional data recovery services. These services have specialized equipment and expertise to recover data from damaged or failed hard drives. However, they can be expensive, and the success of data recovery depends on the extent of the damage to the drive.
Do – It – Yourself Data Recovery Tools
There are also some do – it – yourself data recovery tools available. Tools like Recuva (for Windows) or TestDisk (cross – platform) can be used to attempt to recover data from a damaged or formatted hard drive. However, these tools may not be able to recover data in all cases, especially if the drive has serious hardware problems.
About us and this blog
Panda Assistant is built on the latest data recovery algorithms, ensuring that no file is too damaged, too lost, or too corrupted to be recovered.
Request a free quote
We believe that data recovery shouldn’t be a daunting task. That’s why we’ve designed Panda Assistant to be as easy to use as it is powerful. With a few clicks, you can initiate a scan, preview recoverable files, and restore your data all within a matter of minutes.
Subscribe to our newsletter!
More from our blog
See all posts


Recent Posts
- Dell backup and recovery windows 11 2025-04-21
- Dell os recovery tool keeps crashing 2025-04-21
- Raw hdd data recovery 2025-04-21