When a hard drive fails to appear in Windows Disk Management, it can be a frustrating issue that hampers productivity and data access. This problem can be caused by several factors, ranging from minor system glitches to hardware failures. Fortunately, there are numerous troubleshooting steps that can help identify the cause of the issue and restore functionality to the drive.
1. Disk Management
Windows Disk Management is a built-in tool that allows users to manage their system’s storage devices, such as hard drives, SSDs, and external drives. This utility is essential for performing a variety of tasks like formatting, partitioning, and assigning drive letters to storage devices. When a drive does not show up in Disk Management, it suggests that the system is unable to properly detect the device for one reason or another.
Disk Management should automatically display all connected storage devices, whether they are internal hard drives, external USB drives, or network drives. If your hard drive fails to show up here, it’s important to troubleshoot the issue using a systematic approach to determine the root cause.
Common Causes for Hard Drive Not Showing Up
There are multiple reasons why a hard drive might not appear in Disk Management, including:
Physical connection issues: Loose or faulty cables, power issues, or damaged ports can prevent the drive from being recognized.
Driver issues: Outdated or corrupted drivers may cause Windows to fail to detect the hard drive.
Partition problems: A corrupted or missing partition may lead to the drive not showing up in Disk Management.
Hardware failure: The hard drive itself may be faulty due to mechanical failure, damage, or age.
System errors or glitches: Sometimes, Windows may not detect the drive due to temporary glitches or system misconfigurations.
2. Preliminary Checks
Before diving into complex troubleshooting steps, it’s important to perform basic checks to ensure that the drive is physically connected and powered on.
Confirming the Drive is Powered On
Some external hard drives, particularly those with a separate power supply, may not turn on automatically. Make sure that the drive has power and is turned on. If you’re using an internal drive, check whether the drive’s power cables are properly connected to the system’s power supply.
Checking the Physical Connections
Inspect the cables connecting the hard drive to the computer. A loose or damaged cable can easily prevent the system from detecting the drive. If you’re using a USB external hard drive, try using a different USB port or a different USB cable. For internal drives, check that the SATA data and power cables are securely attached.
Testing the Drive in Another Computer or Port
To determine whether the problem lies with the computer or the drive itself, try connecting the hard drive to a different computer or use another USB port. If the drive shows up on another system, then the issue may lie with your original computer’s settings or hardware.
3. Basic Solutions
Restarting the Computer
Sometimes, simply restarting your computer can resolve detection issues. Windows may need to refresh its hardware settings or resolve temporary glitches, so it’s always worth restarting the system to see if that resolves the issue.
Using Windows Disk Management to Initialize the Drive
If the drive is physically connected and powered on, but it still doesn’t show up in Disk Management, it may need to be initialized. To do this:
Press Win + X and select Disk Management from the menu.
If the drive is recognized but uninitialized, you’ll see a message prompting you to initialize it.
Right-click on the uninitialized drive and select Initialize Disk.
Follow the prompts to choose a partition style (MBR or GPT).
After initialization, the drive should appear in the Disk Management window, allowing you to create a new partition and format it.
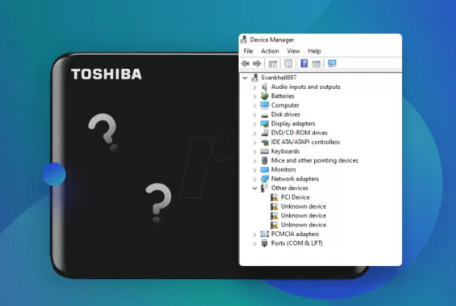
Using Device Manager to Detect the Drive
Windows Device Manager can also be used to check if the system detects the drive. If the drive shows up with an error or warning symbol, you can try to update or reinstall the device driver:
Press Win + X and select Device Manager.
Expand the Disk Drives section to see if your hard drive is listed.
Right-click on the drive and select Update Driver to search for updated drivers, or Uninstall Device to remove it and allow Windows to reinstall the driver on the next restart.
4. Advanced Solutions
If the drive still does not appear in Disk Management, more advanced solutions may be required to troubleshoot the issue.
Updating or Reinstalling Drivers
An outdated or corrupted driver can prevent Windows from detecting your drive. To update or reinstall the driver:
Open Device Manager.
Right-click on your hard drive under Disk Drives.
Select Update Driver or Uninstall Device and restart the system. Windows will attempt to reinstall the correct driver automatically.
Checking for Disk Errors Using CHKDSK
If your hard drive is physically intact but not showing up in Disk Management, it could have file system errors preventing it from being recognized. You can run CHKDSK, a built-in Windows utility, to check for and repair disk errors:
Press Win + R, type cmd, and press Enter.
In the command prompt window, type chkdsk X: /f, replacing “X” with the letter of your hard drive.
Press Enter and wait for CHKDSK to scan and repair any errors.
Assigning a Drive Letter in Disk Management
Sometimes, the drive is recognized by the system but doesn’t show up because it doesn’t have a drive letter assigned. To assign a drive letter:
Open Disk Management.
Right-click on the drive that doesn’t have a letter and select Change Drive Letter and Paths.
Click Add, choose a letter, and click OK.
5. Resolving Hardware-Related Issues
Inspecting the SATA/Power Cables and Ports
If your hard drive is internal, check the SATA and power cables. Faulty or disconnected cables are a common reason for hard drives not showing up. Ensure that both the data and power cables are securely connected to the drive and the motherboard or power supply.
Testing the Power Supply to the Drive
For external hard drives that require external power, check the power supply. Try using a different power adapter or plugging the drive into a different power outlet to rule out power-related issues.
Using a USB to SATA Adapter
If your hard drive is internal but you’re trying to use it externally, you can use a USB to SATA adapter. This adapter allows you to connect an internal hard drive to a USB port, bypassing potential issues with internal ports or cables.
6. Fixing Partition Issues
In some cases, the hard drive might not appear due to a corrupted or missing partition. There are several ways to deal with partition issues.
Dealing with an Unallocated or Raw Drive
If the drive shows up as “Unallocated” or “Raw” in Disk Management, you can create a new partition:
Right-click on the unallocated space in Disk Management.
Select New Simple Volume and follow the wizard to create a new partition.
Recovering Lost Partitions with Data Recovery Software
If you’ve accidentally lost or deleted a partition, third-party data recovery tools can scan the drive for recoverable partitions and restore them.
7. Software Solutions
Using Third-Party Disk Management Tools
If Windows Disk Management fails to resolve the issue, you may consider using third-party disk management software like EaseUS Partition Master, AOMEI Partition Assistant, or MiniTool Partition Wizard. These tools offer additional features and might be able to detect and fix issues that Windows’ built-in tools cannot.
Running Disk Check with Third-Party Utilities
Third-party utilities like HD Tune, CrystalDiskInfo, and SeaTools can be used to check the health of your hard drive and run diagnostic tests to identify problems that might not be apparent with Windows tools alone.
8. When to Seek Professional Help
If you’ve exhausted all troubleshooting methods and the hard drive still isn’t showing up, it could be time to seek professional help. Hard drive failures can sometimes be severe, and attempting further fixes may cause irreversible data loss.
Identifying Serious Hardware Failures
If your hard drive makes unusual sounds, such as clicking, grinding, or buzzing, it could be suffering from a mechanical failure. If the drive isn’t detected in multiple computers or operating systems, this may indicate a hardware issue that requires professional repair.
Choosing the Right Data Recovery Service
Professional data recovery services specialize in retrieving data from damaged or malfunctioning hard drives. Look for companies with good reviews and a proven track record in dealing with hardware failures.
9. Preventative Measures and Maintenance Tips
To avoid encountering similar issues in the future, follow these tips:
Regular Backups: Regularly back up your data to prevent data loss.
Safely Eject Drives: Always eject external drives safely to prevent corruption.
Monitor Disk Health: Use tools like CrystalDiskInfo to monitor the health of your drives.
About us and this blog
Panda Assistant is built on the latest data recovery algorithms, ensuring that no file is too damaged, too lost, or too corrupted to be recovered.
Request a free quote
We believe that data recovery shouldn’t be a daunting task. That’s why we’ve designed Panda Assistant to be as easy to use as it is powerful. With a few clicks, you can initiate a scan, preview recoverable files, and restore your data all within a matter of minutes.
Subscribe to our newsletter!
More from our blog
See all posts


Recent Posts
- How to format mac external hard drive? 2025-01-23
- How to format a hard drive windows 11? 2025-01-23
- Restore data from formatted hard drive 2025-01-23