How to Format Your Passport External Hard Drive for Mac
If you have a Passport external hard drive and want to use it with your Mac, you may need to format it to ensure compatibility. Formatting will erase all data on the drive, so make sure to back up any important information before you proceed.
What You Need
A Passport External Hard Drive: Ensure it’s connected to your Mac.
Your Mac: Running macOS.
Backup: Any data on the drive you wish to keep.
Why Format?
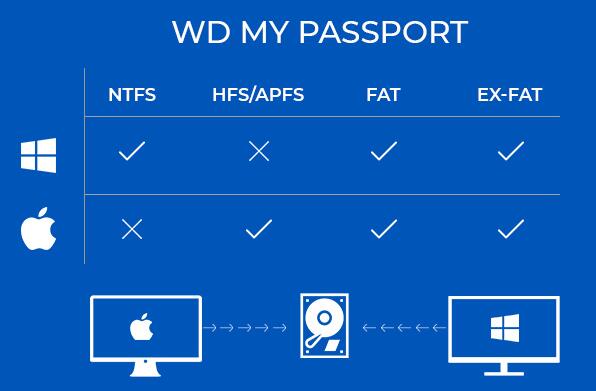
Formatting prepares the drive to be used with macOS, and you may need to do this if the drive is currently formatted for another operating system, like Windows. Mac uses different file systems compared to Windows, so proper formatting ensures compatibility.
Steps to Format Your Passport External Hard Drive for Mac
1. Connect Your Passport Drive
Plug the Passport external hard drive into your Mac using the appropriate USB cable.
Wait for the drive to appear on your desktop or in the Finder sidebar.

2. Open Disk Utility
Access Disk Utility: Click on the Finder icon in your Dock.
Navigate to Applications: Go to Applications > Utilities > Disk Utility.
(Screenshot for reference)
3. Select Your Drive
In Disk Utility, you’ll see a list of drives and volumes on the left sidebar.
Select your Passport external hard drive. Be sure to choose the correct drive to avoid accidentally formatting the wrong one.
(Screenshot for reference)
4. Erase the Drive
Click the Erase button located at the top of the Disk Utility window.
(Screenshot for reference)
Choose a Name: Enter a name for your drive. This will be the name that appears on your desktop and in Finder.
Select a Format: Choose APFS (Apple File System) or Mac OS Extended (Journaled):
APFS: Recommended for newer Macs and SSDs.
Mac OS Extended (Journaled): Suitable for older Macs and traditional hard drives.
Scheme: Choose GUID Partition Map.
(Screenshot for reference)
Confirm Erasure: Click Erase to begin formatting. Disk Utility will now format the drive. This process might take a few minutes.
5. Wait for Formatting to Complete
Disk Utility will show a progress bar. Wait for the process to complete.
Once done, you’ll see a confirmation message indicating that the drive has been successfully erased and formatted.
(Screenshot for reference)
6. Close Disk Utility
Click the Done button once the process is complete.
You can now close Disk Utility.
7. Eject and Reconnect the Drive
To ensure the drive is properly recognized, right-click on the drive icon on your desktop and select Eject.
Disconnect the Passport external hard drive from your Mac.
Reconnect it to verify that it mounts correctly and appears in Finder.
(Screenshot for reference)
Additional Tips
Backup Data: Always ensure you have backups of any important data before formatting.
Check Compatibility: If you need to use the drive with both Mac and Windows, consider formatting it as exFAT, which is compatible with both operating systems.
Disk Utility Alternatives: If Disk Utility doesn’t meet your needs, third-party disk management tools are available, but Disk Utility is usually sufficient for most users.
Troubleshooting
Drive Not Showing Up: Ensure the drive is properly connected. Try different USB ports or cables if necessary.
Formatting Errors: If you encounter errors during formatting, check for any physical issues with the drive or consult the drive’s manufacturer for support.
About us and this blog
Panda Assistant is built on the latest data recovery algorithms, ensuring that no file is too damaged, too lost, or too corrupted to be recovered.
Request a free quote
We believe that data recovery shouldn’t be a daunting task. That’s why we’ve designed Panda Assistant to be as easy to use as it is powerful. With a few clicks, you can initiate a scan, preview recoverable files, and restore your data all within a matter of minutes.
Subscribe to our newsletter!
More from our blog
See all postsRecent Posts
- Recovery ssd upgrade failed exagrid error 2025-04-03
- Smart hard disk error 301 2025-04-03
- Error code 36 external hard drive 2025-04-03


